Purpose
The MPM provides a visual integrated acquisition process map based on “as documented” process for Big “A” acquisition as described and defined in current laws, regulations, and/or guidance. The intended MPM audience is the acquisition workforce with particular emphasis on the Program Executive Officer and his/her staff and Program Managers and his/her staff.
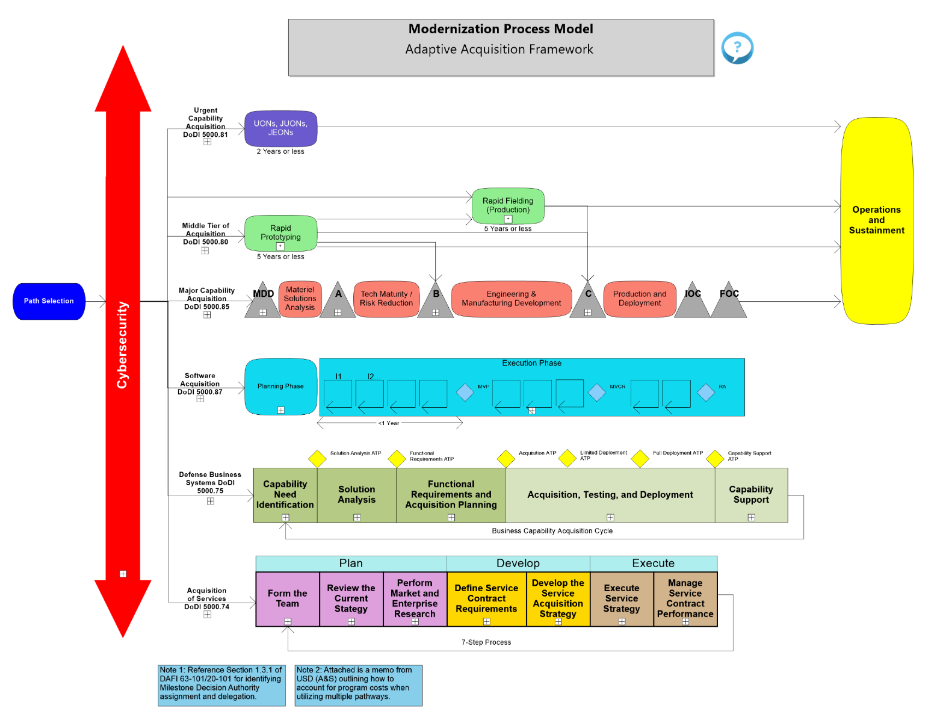
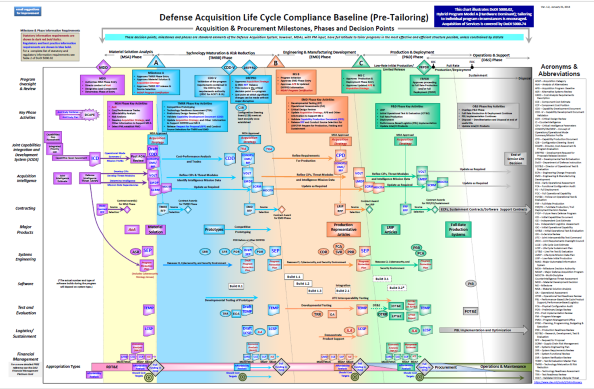
The MPM and the DAU Wall Chart both represent the Acquisition lifecycle. The MPM further refines the activities to constituent parts that identify specific guidance, performers and owners. The MPM is maintained and updated reflecting current changes in law, guidance, and instruction. The MPM is designed to incorporate various process perspectives, with emphasis on:
- Joint Capability Integration Development System, CJCSI 5123.01I
- The Defense Acquisition System, DoDI 5000.02
- The Programming, Planning, Budgeting & Execution process, AFPD 90-6.
SAF/AQX owns the MPM and manages the MPM configuration control process through the MPM Decision Board (DB). Also, the chair of the MPMDB, the Acquisition Chief Process Officer is the final approval authority for changes made to the MPM.
Content
The MPM starts in the Adaptive Acquisition Framework which shows multiple acquisition pathways for delivering capability as directed by the following: DoDI 5000.02, DoDI 5000.74, DoDI 5000.75, and FY16 NDAA Section 804.
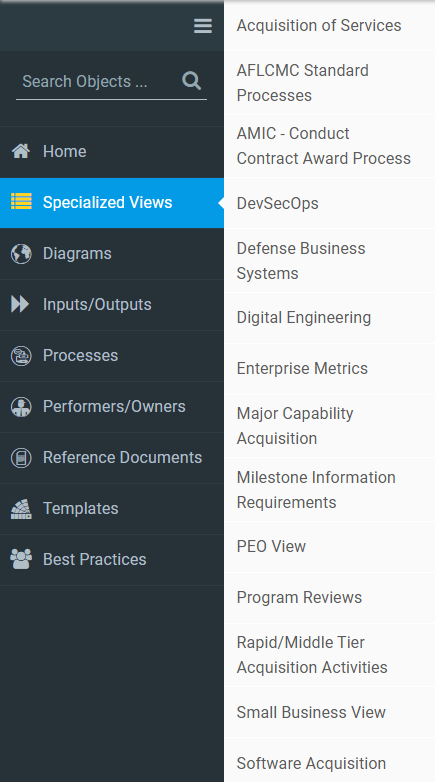
Additionally, as available from the left hand menu, the MPM provides specialized views for the following:
- Acquisition of Services: Process details consistent with Acquisition of Services covered in DoDI 5000.02 and DoDI 5000.74.
- AFLCMC Standard Processes: All AFLCMC Standard Processes in the MPM.
- AMIC – Conduct Contract Award Process: All AMIC (Acquisition Management and Integration Center) contact award processes in the MPM.
- Defense Business Systems: Process details consistent with DoDI 5000.75 and AFMAN 63-144.
- DevSecOps: Process details consistent with DoD Enterprise DevSecOps Reference Design.
- Digital Engineering: Getting started actions for a program that is going Digital.
- Enterprise Metrics: Cycle times for ACAT I programs.
- Major Capability Acquisition: Process details consistent with DoDI 5000.85, public laws, and DAF Documents. This view has five primary process areas:
- Oversight (1.1): Reviews and approvals.
- PPBE (1.2): Planning, programming, budgeting, and execution.
- Develop Requirements and Preliminary Design (1.3): Technology development, program processes up to Milestone B, and rapid acquisition.
- Acquire (1.4): Program processes from Milestone B through disposal, contracting, and test.
- Conduct “Program” Management Tasks (1.5): Program processes that occur independent of lifecycle phase.
- Milestone Information Requirements: DoDI 5000.02 information requirements for ACAT I program by decision point.
- PEO View: Dashboard of key processes for quick access.
- Program Reviews View: Program review summary between milestones.
- Rapid/Middle Tier Activities: Implementation of FY16 NDAA Section 804
- Small Business View: Core processes for small business professionals.
- Software Acquisition: Process details consistent with Software Acquisition in DoDI 5000.02 and DoDI 5000.87.
The MPM uses a tiering structure similar to a work breakdown structure. Generally, each tier has a specific focus and hierarchical authority:
- Tier 0 (1.0): The macro level process at the Service Acquisition Executive (SAE) and Defense Acquisition Executive level.
- Tier 1 (numbered 1.x): Process area at the SAE/2 Letter (LTR) level.
- Tier 2 (numbered 1.x.x): Subprocess area at the Program Executive Officer (PEO)/3 LTR level.
- Tier 3 (numbered 1.x.x.x): Supporting process area at the PEO/4 LTR level.
- Tier 4 (numbered 1.x.x.x.x): Activity area at the Program Manager (PM) level.
- Tier 5 (numbered 1.x.x.x.x.x): Sub activity area at the PM and Action Officer (AO) level.
- Tier 6 (numbered 1.x.x.x.x.x.x): Action area at the AO level.
- Tier 7 (numbered 1.x.x.x.x.x.x.x): Sub action area at the Journeyman level.
- Tier 8 and below (numbered 1.x.x.x.x.x.x.x.x): Supporting Action area at the trainee level.
The MPM defines certain processes as being either Governing, Core, or Enabling. These types of processes were defined by Dr. Michael Hammer. Below are the definitions used for these process types.
|
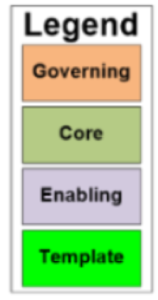 |
|
|
|
Some of the inputs/outputs are colored because they have an associated template.
- Each MPM process box contains the following metadata:
- Name: Title of the process as described in the authoritative source.
- Description: As described within the authoritative source.
- Process Owner: The organization/person with authority over the execution and result of the process.
- Process Performers: The organizations/persons who participate in the execution of the process.
- Reference Document: The authoritative source for the process.
- Active Link: A hyperlink associated with the authoritative source.
- Other Metadata: Where applicable, some processes will include metadata for Cycle Time, IT System, Technology, or Timing
- Each process box will have one or more affiliated input and output box(es). These boxes contain the associated metadata as defined by the authoritative source.
- Description: Narrative as defined by the authoritative source.
- Diagrammed On: Diagram(s) within the MPM containing the selected input or output (as defined by the authoritative source(s)).
- Other Metadata: Where applicable, some inputs/outputs will include metadata that indicate if the input/output is Statutory or Regulatory and the corresponding document or a Template.
Changes in relevant regulations, instruction and/or functionality will cause SAF/AQXP to update the MPM.
SAF/AQXP updates the MPM no less than monthly; however, SAF/AQXP may make more frequent updates as driven by changes in guidance or introduction of new functionality and/or information.
During recent trainings, the attendees were ask if the home page of the MPM should be changed from the 1.0 Perform Air Force Acquisition page to the Adaptive Acquisition Framework page. The results of that led to the MPM changing its home page. The 1.0 page can be found under the Specialized Views on the left-hand menu under Major Capability Acquisition.
Functionality
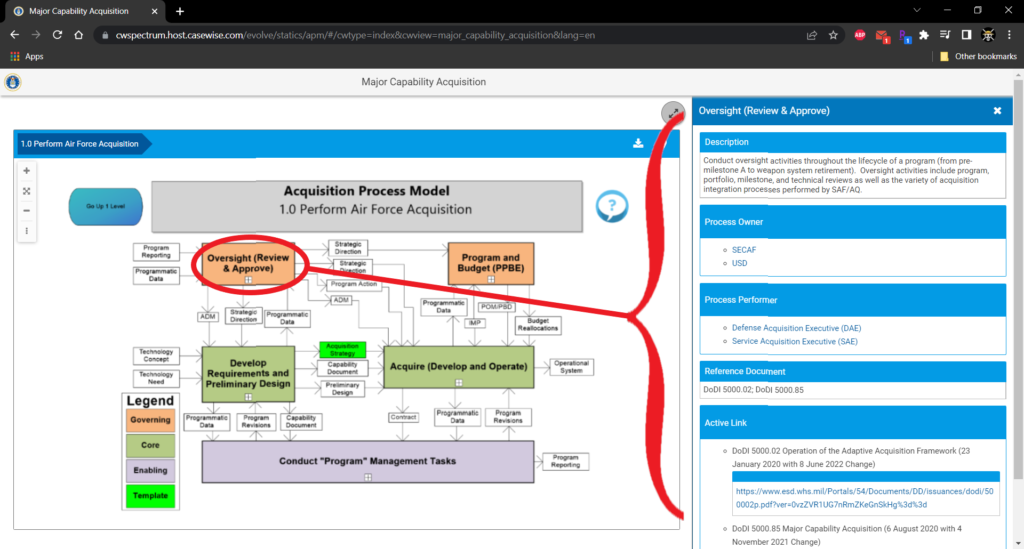
Select the process box. On the right side of the screen, a pop-out will appear that contains the metadata (properties) of the process.
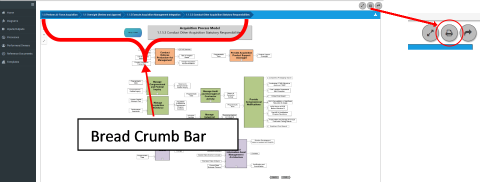
A print icon appears on the top right corner of the screen.
NOTE: To print an MPM diagram, ensure the selected diagram is the first diagram listed in the breadcrumb bar. To do this, go to the “Diagrams” page, select the desired diagram (a new page will open with the selected diagram first in the breadcrumb bar). Select the print icon to print the page.
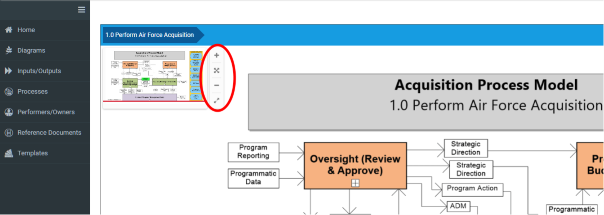
- Four image control tools on the top left corner of the screen allow viewing changes: zoom-in (plus sign), reset image (crossed arrows), zoom-out (minus sign), and full screen (two arrows). A fifth tool appears when the cursor hovers over the image. This tool allows the user to minimize the image to just show the four tools.
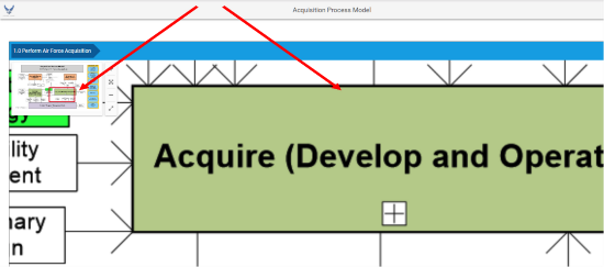
- The user will see a red box within the image as the screen magnification increases. This red box provides a location reference to the magnified diagram. The user can left select the red box to reveal other areas of interest in the diagram.
The MPM provides five navigation tools.
- Lower Level Navigation: If a lower level process is available, the process box will contain a small box with a “+” symbol. Select the “+” to navigate to the next level process.

- Higher Level Navigation: If a higher-level process is available, a “Go Up 1 Level” box will be available. Select the box to navigate to the next higher level (e.g., If you are on the 1.3.2 Develop Preliminary Design process and select the “Go Up 1 Level”, you will navigate to the 1.3 Develop Requirements and Preliminary Design process).

- Horizontal Navigation: The icons marked “BACK” and “FWD” provide lateral movement to connected processes (e.g., From page 1.3.1 Technology Development process, select the “FWD” to move to 1.3.2 Develop Preliminary Design process. Select “BACK” to return to 1.3.1 Technology Development process page).

- Process Inputs and/or Outputs Navigation: From any page in the MPM, select the input/output to see all pages where the input/output is referenced (NOTE Each input/output is hyperlinked to all other occurrences in the model).
- Select Page: The “Diagrams” tab (left side of the screen) provides two viewing options for the diagrams. Selecting the folder icon (Grid) or the process name (List) for a specific process opens that process page.
The model provides three search tools:
-
- General Filter (On each of the “Select Page” tabs): You can do a general search by using the “Filter the content of this page” box in the top right.
- Focused Filter (On each of the “Select Page” tabs): You can do a focused search selecting any of the filter icons on a column to search that specific column.

- Universal Search: Found at the top of the left-hand menu, the Universal Search will look in all objects for the search string. By default a Universal Search will look in the name only of all objects.

To change this to all properties for objects, follow these steps:<- Perform a search for what you are looking for (e.g. AQXP)

- In the search results, click on “Name Only”
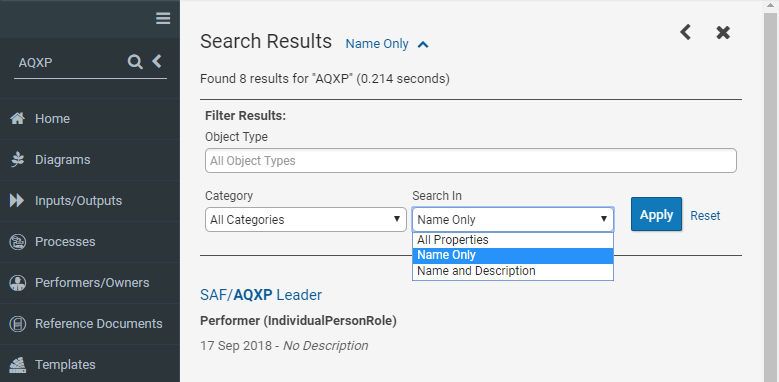
- Change the “Search In” dropdown to “All Properties” and click “Apply”
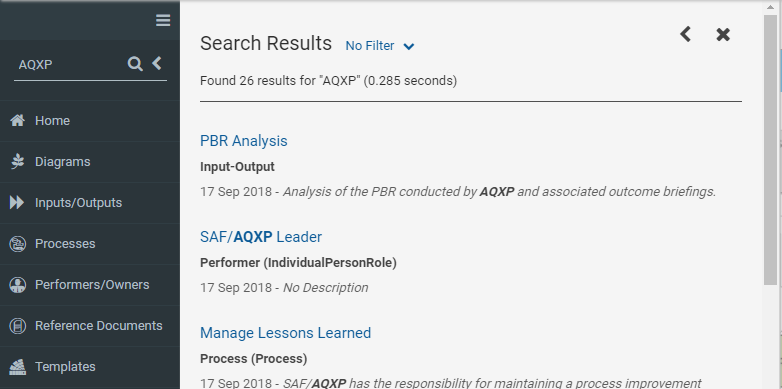
- Perform a search for what you are looking for (e.g. AQXP)
The specialized views can be accessed from the left hand menu. Click on “Specialized Views” and then on the view you wish to open.
Success Stories
- The 2016 Air Force Strategic Master Plan directed the Institutionalization of the MPM. Formal MPM institutionalization occurred September 2016, upon Ms. Costello’s signature to the MPM Institutionalization memo.
- The MPM provided a process framework for various Rapid Improvement Events (RIE), including the Acquisition Program Reporting Tiger Team and Interoperability events. The RIEs leveraged the relevant processes as the current state baseline. The MPM also provided the specific policies underlying the processes. Tangible savings include a $7 million cost reduction from the Acquisition Program Reporting Tiger Team.
- The MPM provided the basis of standard processes for Acquisition in support of the statutorily required Organization Execution Plan (10 USC 2222).
- The MPM served as a process foundation to create the Acquisition Enterprise Architecture (AcqEA). Specifically, the MPM is the approved process component for the AcqEA.
- The MPM provided the process foundation for the development of SAF/SP Organizational Design CoAs for the standup of SAF/SQ.
- Additional success stories are found under CORE DOCUMENTS, SAF/AQX Strategic Change Management Documents
Communication
There are three options to provide comments or feedback.
- Select the “Documents” tab and then the “Core Documents” sub-tab, complete and submit the “Change Request Form”, to the enclosed email address.
- Select the “Contact Us” tab, fill out the form with the recommendations.
- On each page in the model is a “Question” icon that takes you to a form to provide feedback regarding that page.
- Select the “Contact Us” tab, fill out the form with a request to be added to the MPM updates distribution list.
- Additionally, one can access change logs through the “Document Changes” subtab found under the “Documents” tab.
Select the “Contact Us” tab, fill out the form to request additional information about the MPM. SAF/AQXP personnel will respond to your request within two business days.
To cite a diagram in the model the following format is recommended:
[Diagram Banner Bar Name], DAF Modernization Process Model, Version X.X ([Date]), [Page URL]
To get the [Page URL], you will need to go to the “Diagrams” tab on the left hand side. Once there, search for the page you want to use such as “1.2.1 Conduct Planning”. Click on the gray box next to the diagram name. This diagram should now be displayed on your screen. The URL in the address bar is a unique URL for this diagram and should be used for citation.
e.g.: 1.2.1 Conduct Planning, DAF Modernization Process Model, Version 9.1 (08 Feb 2019), https://cwspectrum.host.casewise.com/evolve/statics/mpm/#/cwtype=single&cwview=diagram&lang=en&cwid=474
Troubleshooting
To share or print a MPM diagram, you will need to ensure the selected diagram is listed first in the breadcrumb bar. To do this, go to the “Diagrams” page and then select the diagram you wish to share or print. Once it is the first diagram in the breadcrumb bar, you will be able to share or print using the “Share” or “Print” button.
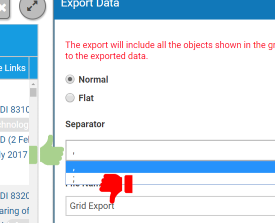
You need to ensure that you choose the “COMMA” as the separator and NOT the “SEMICOLON”. This ensures the file opens correctly in Excel.
Google Chrome and Microsoft Edge work best.

